You’ve probably heard about fuel cells. In 2003, President Bush announced a program called the Hydrogen Fuel Initiative (HFI) during his State of the Union Address. This initiative, supported by legislation in the Energy Policy Act of 2005 (EPACT 2005) and the Advanced Energy Initiative of 2006, aims to develop hydrogen, fuel cell and infrastructure technologies to make fuel-cell vehicles practical and cost-effective by 2020. The United States has dedicated more than one billion dollars to fuel cell research and development so far.
So what exactly is a fuel cell, anyway? Why are governments, private businesses and academic institutions collaborating to develop and produce them? Fuel cells generate electrical power quietly and efficiently, without pollution. Unlike power sources that use fossil fuels, the by-products from an operating fuel cell are heat and water. But how does it do this?
If you want to be technical about it, a fuel cell is an electrochemical energy conversion device. A fuel cell converts the chemicals hydrogen and oxygen into water, and in the process it produces electricity.
The other electrochemical device that we are all familiar with is the battery. A battery has all of its chemicals stored inside, and it converts those chemicals into electricity too. This means that a battery eventually "goes dead" and you either throw it away or recharge it.
With a fuel cell, chemicals constantly flow into the cell so it never goes dead -- as long as there is a flow of chemicals into the cell, the electricity flows out of the cell. Most fuel cells in use today use hydrogen and oxygen as the chemicals.
Sir William Grove invented the first fuel cell in 1839. Grove knew that water could be split into hydrogen and oxygen by sending an electric current through it (a process called electrolysis). He hypothesized that by reversing the procedure you could produce electricity and water. He created a primitive fuel cell and called it a gas voltaic battery. After experimenting with his new invention, Grove proved his hypothesis. Fifty years later, scientists Ludwig Mond and Charles Langer coined the term fuel cell while attempting to build a practical model to produce electricity.
There are several different types of fuel cells, each using a different chemistry. Fuel cells are usually classified by their operating temperature and the type of electrolyte they use. Some types of fuel cells work well for use in stationary power generation plants. Others may be useful for small portable applications or for powering cars. The main types of fuel cells include:
Polymer exchange membrane fuel cell (PEMFC)
The Department of Energy (DOE) is focusing on the PEMFC as the most likely candidate for transportation applications. The PEMFC has a high power density and a relatively low operating temperature (ranging from 60 to 80 degrees Celsius, or 140 to 176 degrees Fahrenheit). The low operating temperature means that it doesn't take very long for the fuel cell to warm up and begin generating electricity.
Solid oxide fuel cell (SOFC)
These fuel cells are best suited for large-scale stationary power generators that could provide electricity for factories or towns. This type of fuel cell operates at very high temperatures (between 700 and 1,000 degrees Celsius). This high temperature makes reliability a problem, because parts of the fuel cell can break down after cycling on and off repeatedly. However, solid oxide fuel cells are very stable when in continuous use. In fact, the SOFC has demonstrated the longest operating life of any fuel cell under certain operating conditions. The high temperature also has an advantage: the steam produced by the fuel cell can be channeled into turbines to generate more electricity. This process is called co-generation of heat and power (CHP) and it improves the overall efficiency of the system.
Alkaline fuel cell (AFC)
This is one of the oldest designs for fuel cells; the United States space program has used them since the 1960s. The AFC is very susceptible to contamination, so it requires pure hydrogen and oxygen. It is also very expensive, so this type of fuel cell is unlikely to be commercialized.
Molten-carbonate fuel cell (MCFC)
Like the SOFC, these fuel cells are also best suited for large stationary power generators. They operate at 600 degrees Celsius, so they can generate steam that can be used to generate more power. They have a lower operating temperature than solid oxide fuel cells, which means they don't need such exotic materials. This makes the design a little less expensive.
Phosphoric-acid fuel cell (PAFC)
The phosphoric-acid fuel cell has potential for use in small stationary power-generation systems. It operates at a higher temperature than polymer exchange membrane fuel cells, so it has a longer warm-up time. This makes it unsuitable for use in cars.
Direct-methanol fuel cell (DMFC)
Methanol fuel cells are comparable to a PEMFC in regards to operating temperature, but are not as efficient. Also, the DMFC requires a relatively large amount of platinum to act as a catalyst, which makes these fuel cells expensive.
Source : How Stuff Works , Wikipedia
Showing posts with label Electrochemistry. Show all posts
Showing posts with label Electrochemistry. Show all posts
Saturday, April 07, 2007


Friday, April 06, 2007
A Hydrogen Fule Cell In Ten Minutes
A fuel cell is a device that converts a fuel such as hydrogen, alcohol, gasoline, or methane into electricity directly. A hydrogen fuel cell produces electricity without any pollution, since pure water is the only byproduct.
Hydrogen fuel cells are used in spacecraft and other high-tech applications where a clean, efficient power source is needed.
You can make a hydrogen fuel cell in your kitchen in about 10 minutes, and demonstrate how hydrogen and oxygen can combine to produce clean electrical power.
To make the fuel cell, we need the following:
>One foot of platinum coated nickel wire, or pure platinum wire.
>A popsickle stick or similar small piece of wood or plastic.
>A 9 volt battery clip.
>A 9 volt battery.
>Some transparent sticky tape.
>A glass of water.
>A volt meter.
The first step is to cut the platinum coated wire into two six inch long pieces, and wind each piece into a little coiled spring that will be the electrodes in our fuel cell. Next, we cut the leads of the battery clip in half and strip the insulation off of the cut ends. Then we twist the bare wires onto the ends of the platinum coated electrodes, as shown in the photo. The battery clip will be attached to the electrodes, and two wires will also be attached to the electrodes, and will later be used to connect to the volt meter.

The electrodes are then taped securely to the popsickle stick. Lastly, the popsickle stick is taped securely to the glass of water, so that the electrodes dangle in the water for nearly their entire length. The twisted wire connections must stay out of the water, so only the platinum coated electrodes are in the water.
Now connect the red wire to the positive terminal of the volt meter, and the black wire to the negative (or "common") terminal of the volt meter. The volt meter should read 0 volts at this point, although a tiny amount of voltage may show up, such as 0.01 volts.

Your fuel cell is now complete.
To operate the fuel cell, we need to cause bubbles of hydrogen to cling to one electrode, and bubbles of oxygen to cling to the other. There is a very simple way to do this.
We touch the 9 volt battery to the battery clip (we don't need to actually clip it on, since it will only be needed for a second or two).
Touching the battery to the clip causes the water at the electrodes to split into hydrogen and oxygen, a process called electrolysis. You can see the bubbles form at the electrodes while the battery is attached.

Now we remove the battery. If we were not using platinum coated wire, we would expect to see the volt meter read zero volts again, since there is no battery connected.
The platinum acts as a catalyst, allowing the hydrogen and oxygen to recombine.
The hydrolysis reaction reverses. Instead of putting electricity into the cell to split the water, hydrogen and oxygen combine to make water again, and produce electricity.

We initially get a little over two volts from the fuel cell. As the bubbles pop, dissolve in the water, or get used up by the reaction, the voltage drops, quickly at first, then more slowly.

After a minute or so, the voltage declines much more slowly, as most of the decline is now due only to the gasses being used up in the reaction that produces the electricity.
Notice that we are storing the energy from the 9 volt battery as hydrogen and oxygen bubbles.
We could instead bubble hydrogen and oxygen from some other source over the electrodes, and still get electricity. Or we could produce hydrogen and oxygen during the day from solar power, and store the gasses, then use them in the fuel cell at night. We could also store the gasses in high pressure tanks in an electric car, and generate the electricity the car needs from a fuel cell.
OK the fun part again :
The electrode connected to the negative side of the battery has electrons that are being pushed by the battery. Four of the electrons in that electrode combine with four water molecules. The four water molecules each give up a hydrogen atom, to form two molecules of hydrogen (H2), leaving four negatively charged ions of OH-.

The hydrogen gas bubbles up from the electrode, and the negatively charged migrate away from the negatively charged electrode.
At the other electrode, the positive side of the battery pulls electrons from the water molecules. The water molecules split into positively charged hydrogen atoms (single protons), and oxygen molecules. The oxygen molecules bubble up, and the protons migrate away from the positively charged electrode.

The protons eventually combine with the OH- ions from the negative electrode, and form water molecules again.
When we remove the battery, the hydrogen molecules that are clinging as bubbles to the electrode, break up due to the catalytic action of the platinum, forming positively charged hydrogen ions (H+, or protons), and electrons

At the other electrode, the oxygen molecules stuck in bubbles on the platinum surface draw electrons from the metal, and then combine with the hydrogen ions in the water (from the reaction at the other electrode) to form water.

The oxygen electrode has lost two electrons to each oxygen molecule. The hydrogen electrode has gained two electrons from each hydrogen molecule. The electrons at the hydrogen electrode are attracted to the positively charged oxygen electrode. Electrons travel more easily in metal than in water, so the current flows in the wire, instead of the water. In the wire, the current can do work, such as lighting a bulb, or moving a meter.
source : sci-toys
Hydrogen fuel cells are used in spacecraft and other high-tech applications where a clean, efficient power source is needed.
You can make a hydrogen fuel cell in your kitchen in about 10 minutes, and demonstrate how hydrogen and oxygen can combine to produce clean electrical power.
To make the fuel cell, we need the following:
>One foot of platinum coated nickel wire, or pure platinum wire.
>A popsickle stick or similar small piece of wood or plastic.
>A 9 volt battery clip.
>A 9 volt battery.
>Some transparent sticky tape.
>A glass of water.
>A volt meter.
The first step is to cut the platinum coated wire into two six inch long pieces, and wind each piece into a little coiled spring that will be the electrodes in our fuel cell. Next, we cut the leads of the battery clip in half and strip the insulation off of the cut ends. Then we twist the bare wires onto the ends of the platinum coated electrodes, as shown in the photo. The battery clip will be attached to the electrodes, and two wires will also be attached to the electrodes, and will later be used to connect to the volt meter.
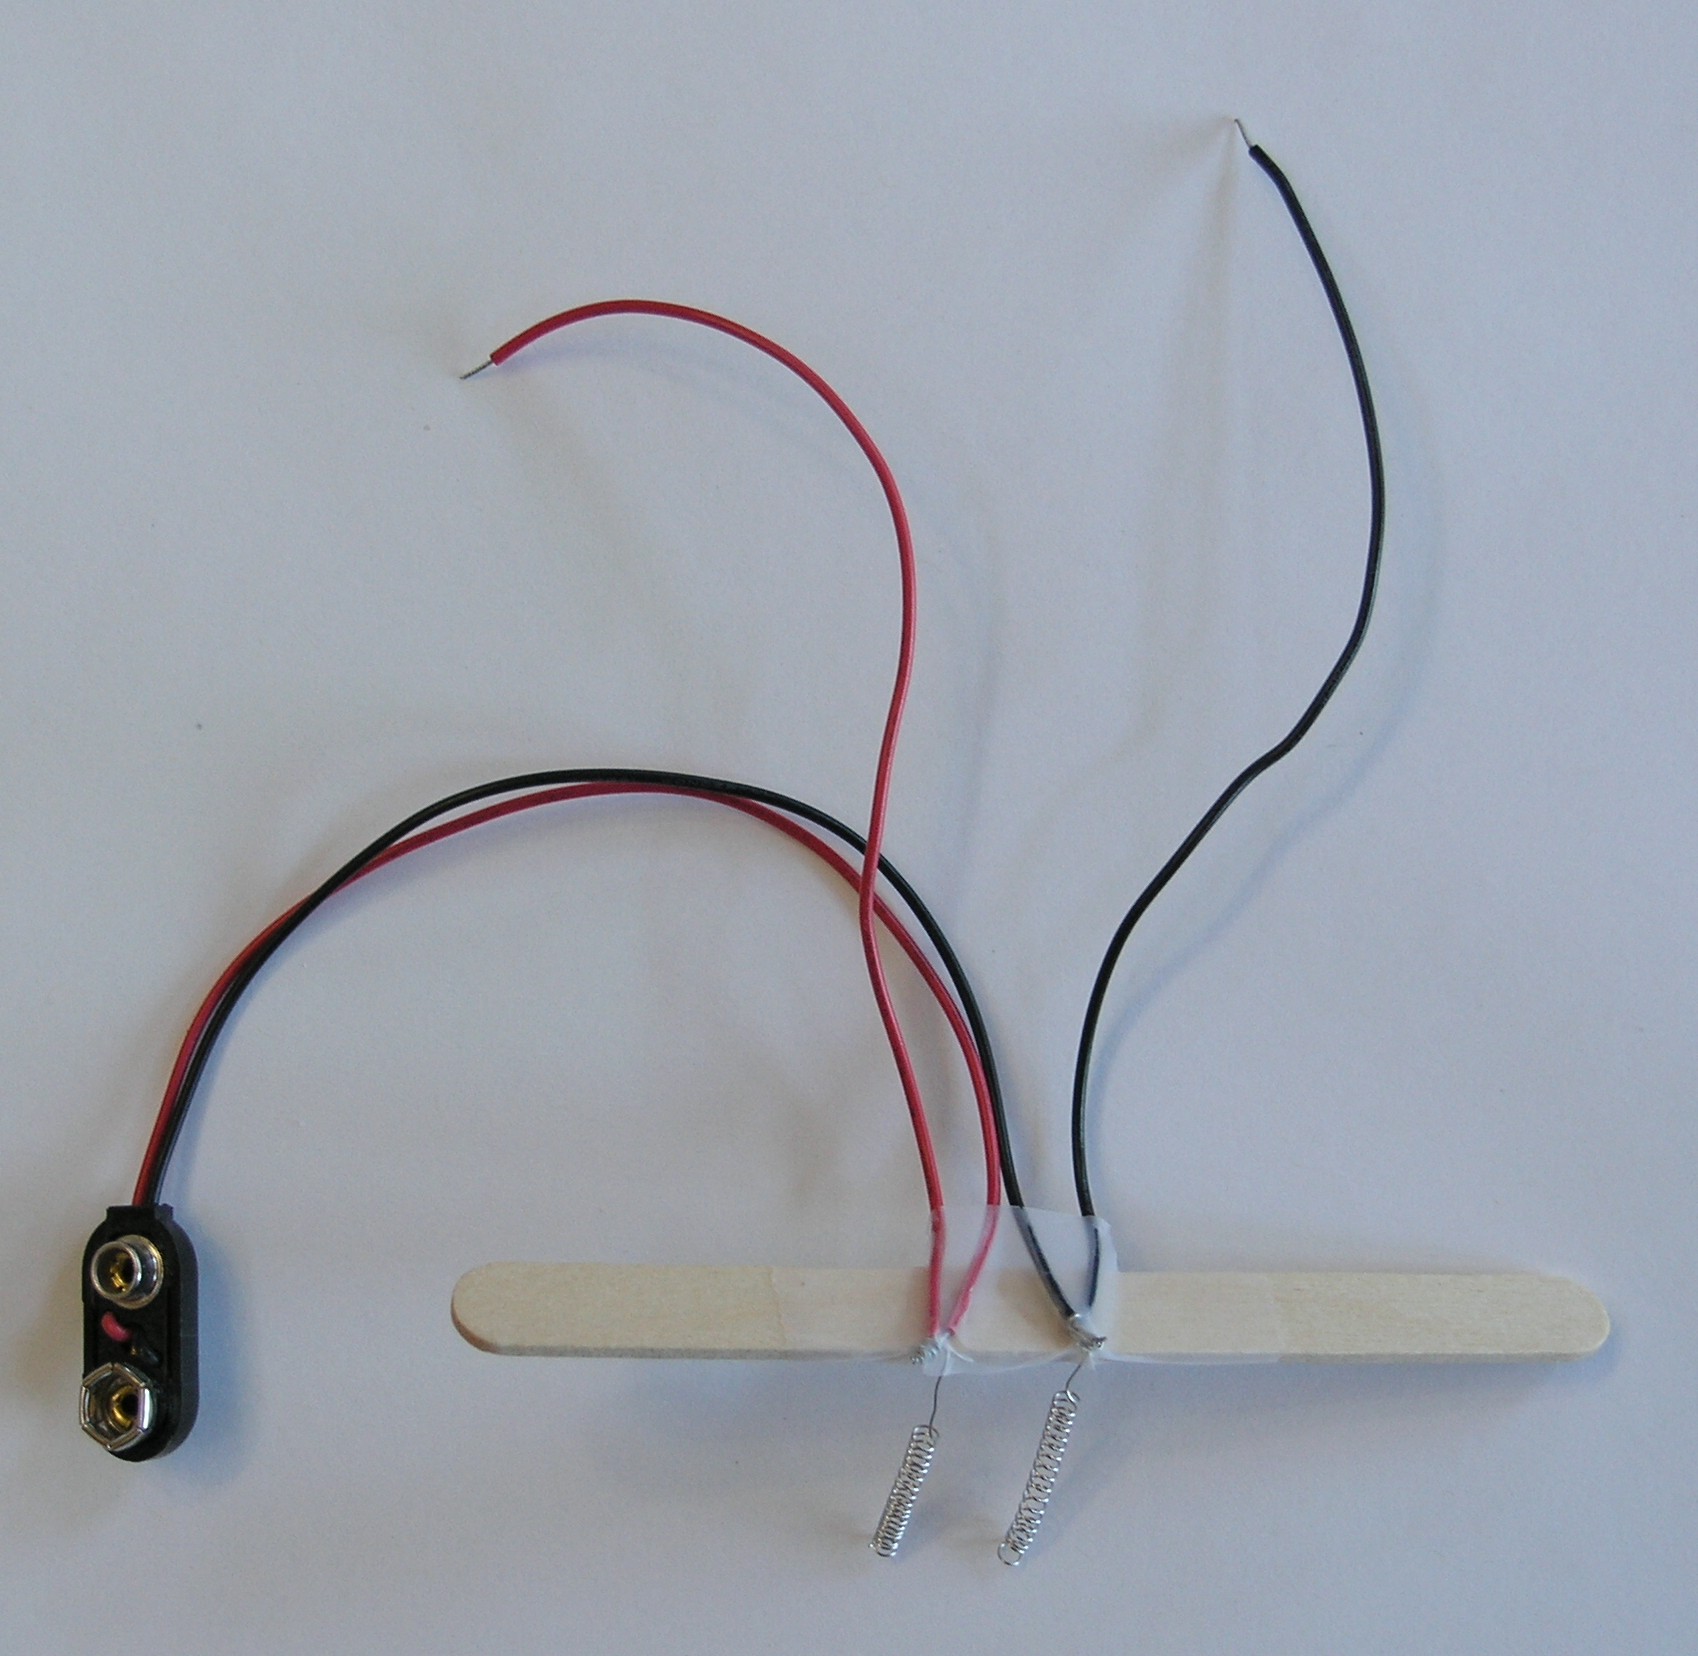
The electrodes are then taped securely to the popsickle stick. Lastly, the popsickle stick is taped securely to the glass of water, so that the electrodes dangle in the water for nearly their entire length. The twisted wire connections must stay out of the water, so only the platinum coated electrodes are in the water.
Now connect the red wire to the positive terminal of the volt meter, and the black wire to the negative (or "common") terminal of the volt meter. The volt meter should read 0 volts at this point, although a tiny amount of voltage may show up, such as 0.01 volts.
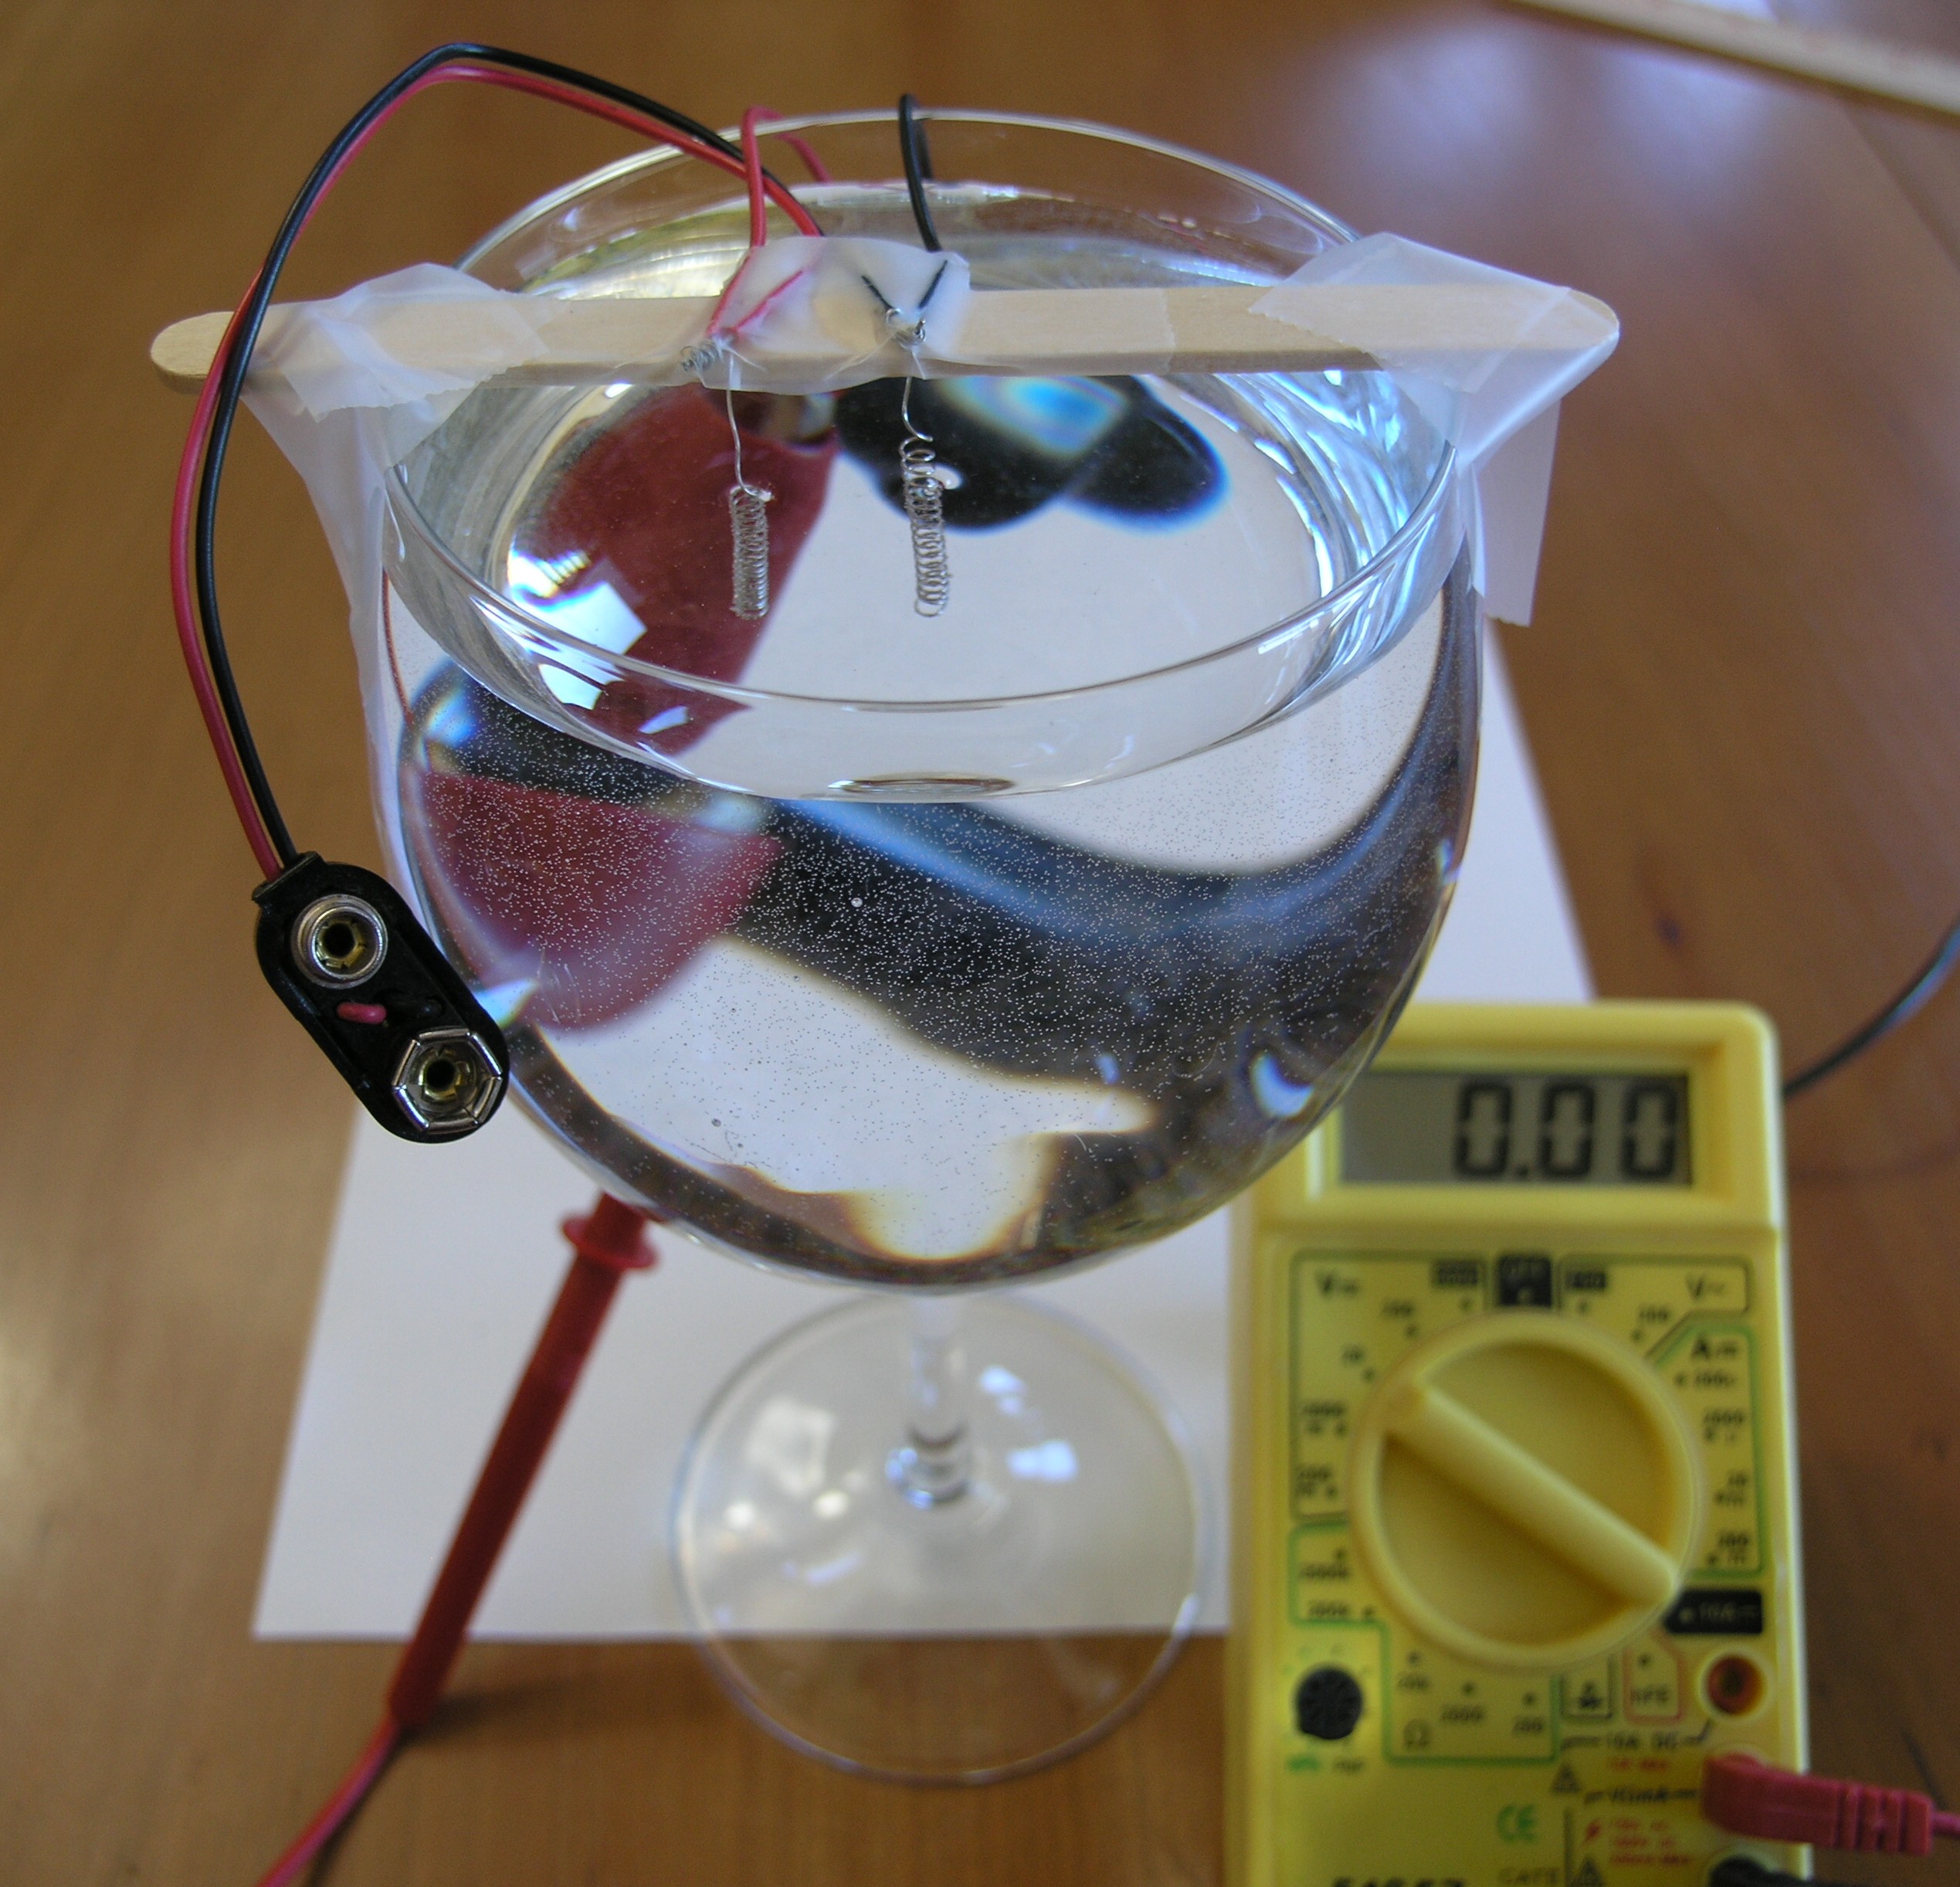
Your fuel cell is now complete.
To operate the fuel cell, we need to cause bubbles of hydrogen to cling to one electrode, and bubbles of oxygen to cling to the other. There is a very simple way to do this.
We touch the 9 volt battery to the battery clip (we don't need to actually clip it on, since it will only be needed for a second or two).
Touching the battery to the clip causes the water at the electrodes to split into hydrogen and oxygen, a process called electrolysis. You can see the bubbles form at the electrodes while the battery is attached.
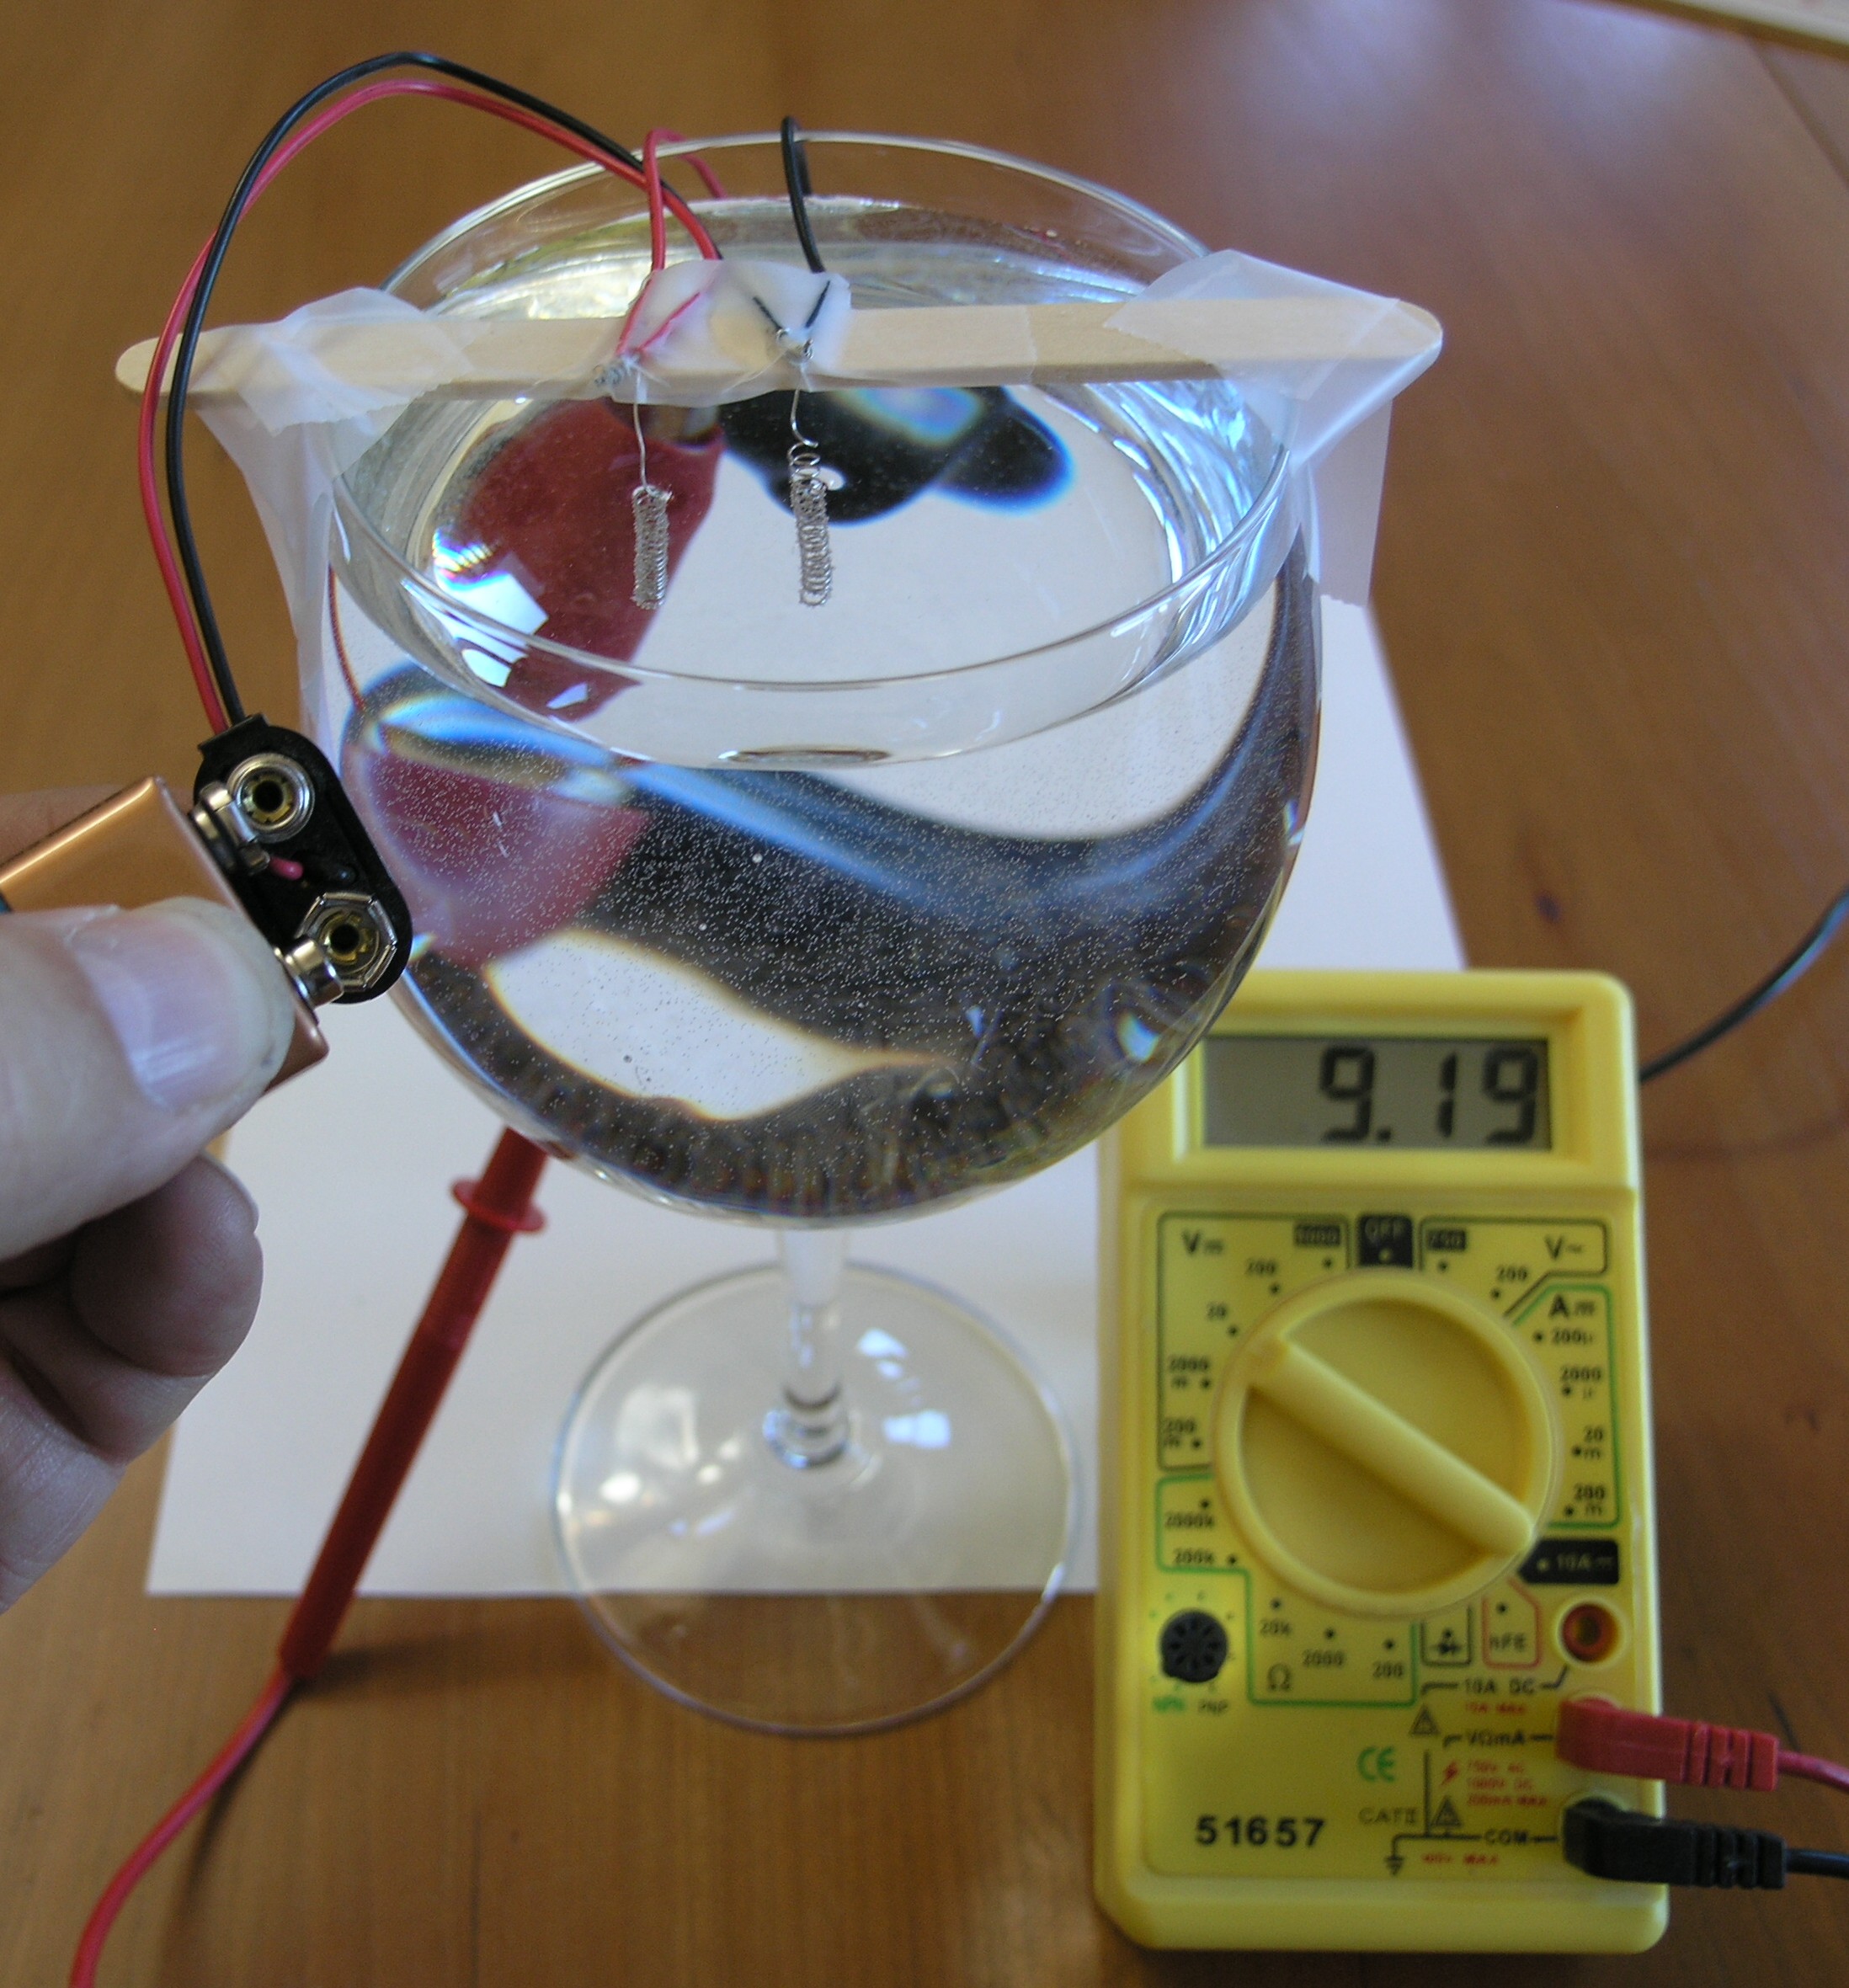
Now we remove the battery. If we were not using platinum coated wire, we would expect to see the volt meter read zero volts again, since there is no battery connected.
The platinum acts as a catalyst, allowing the hydrogen and oxygen to recombine.
The hydrolysis reaction reverses. Instead of putting electricity into the cell to split the water, hydrogen and oxygen combine to make water again, and produce electricity.
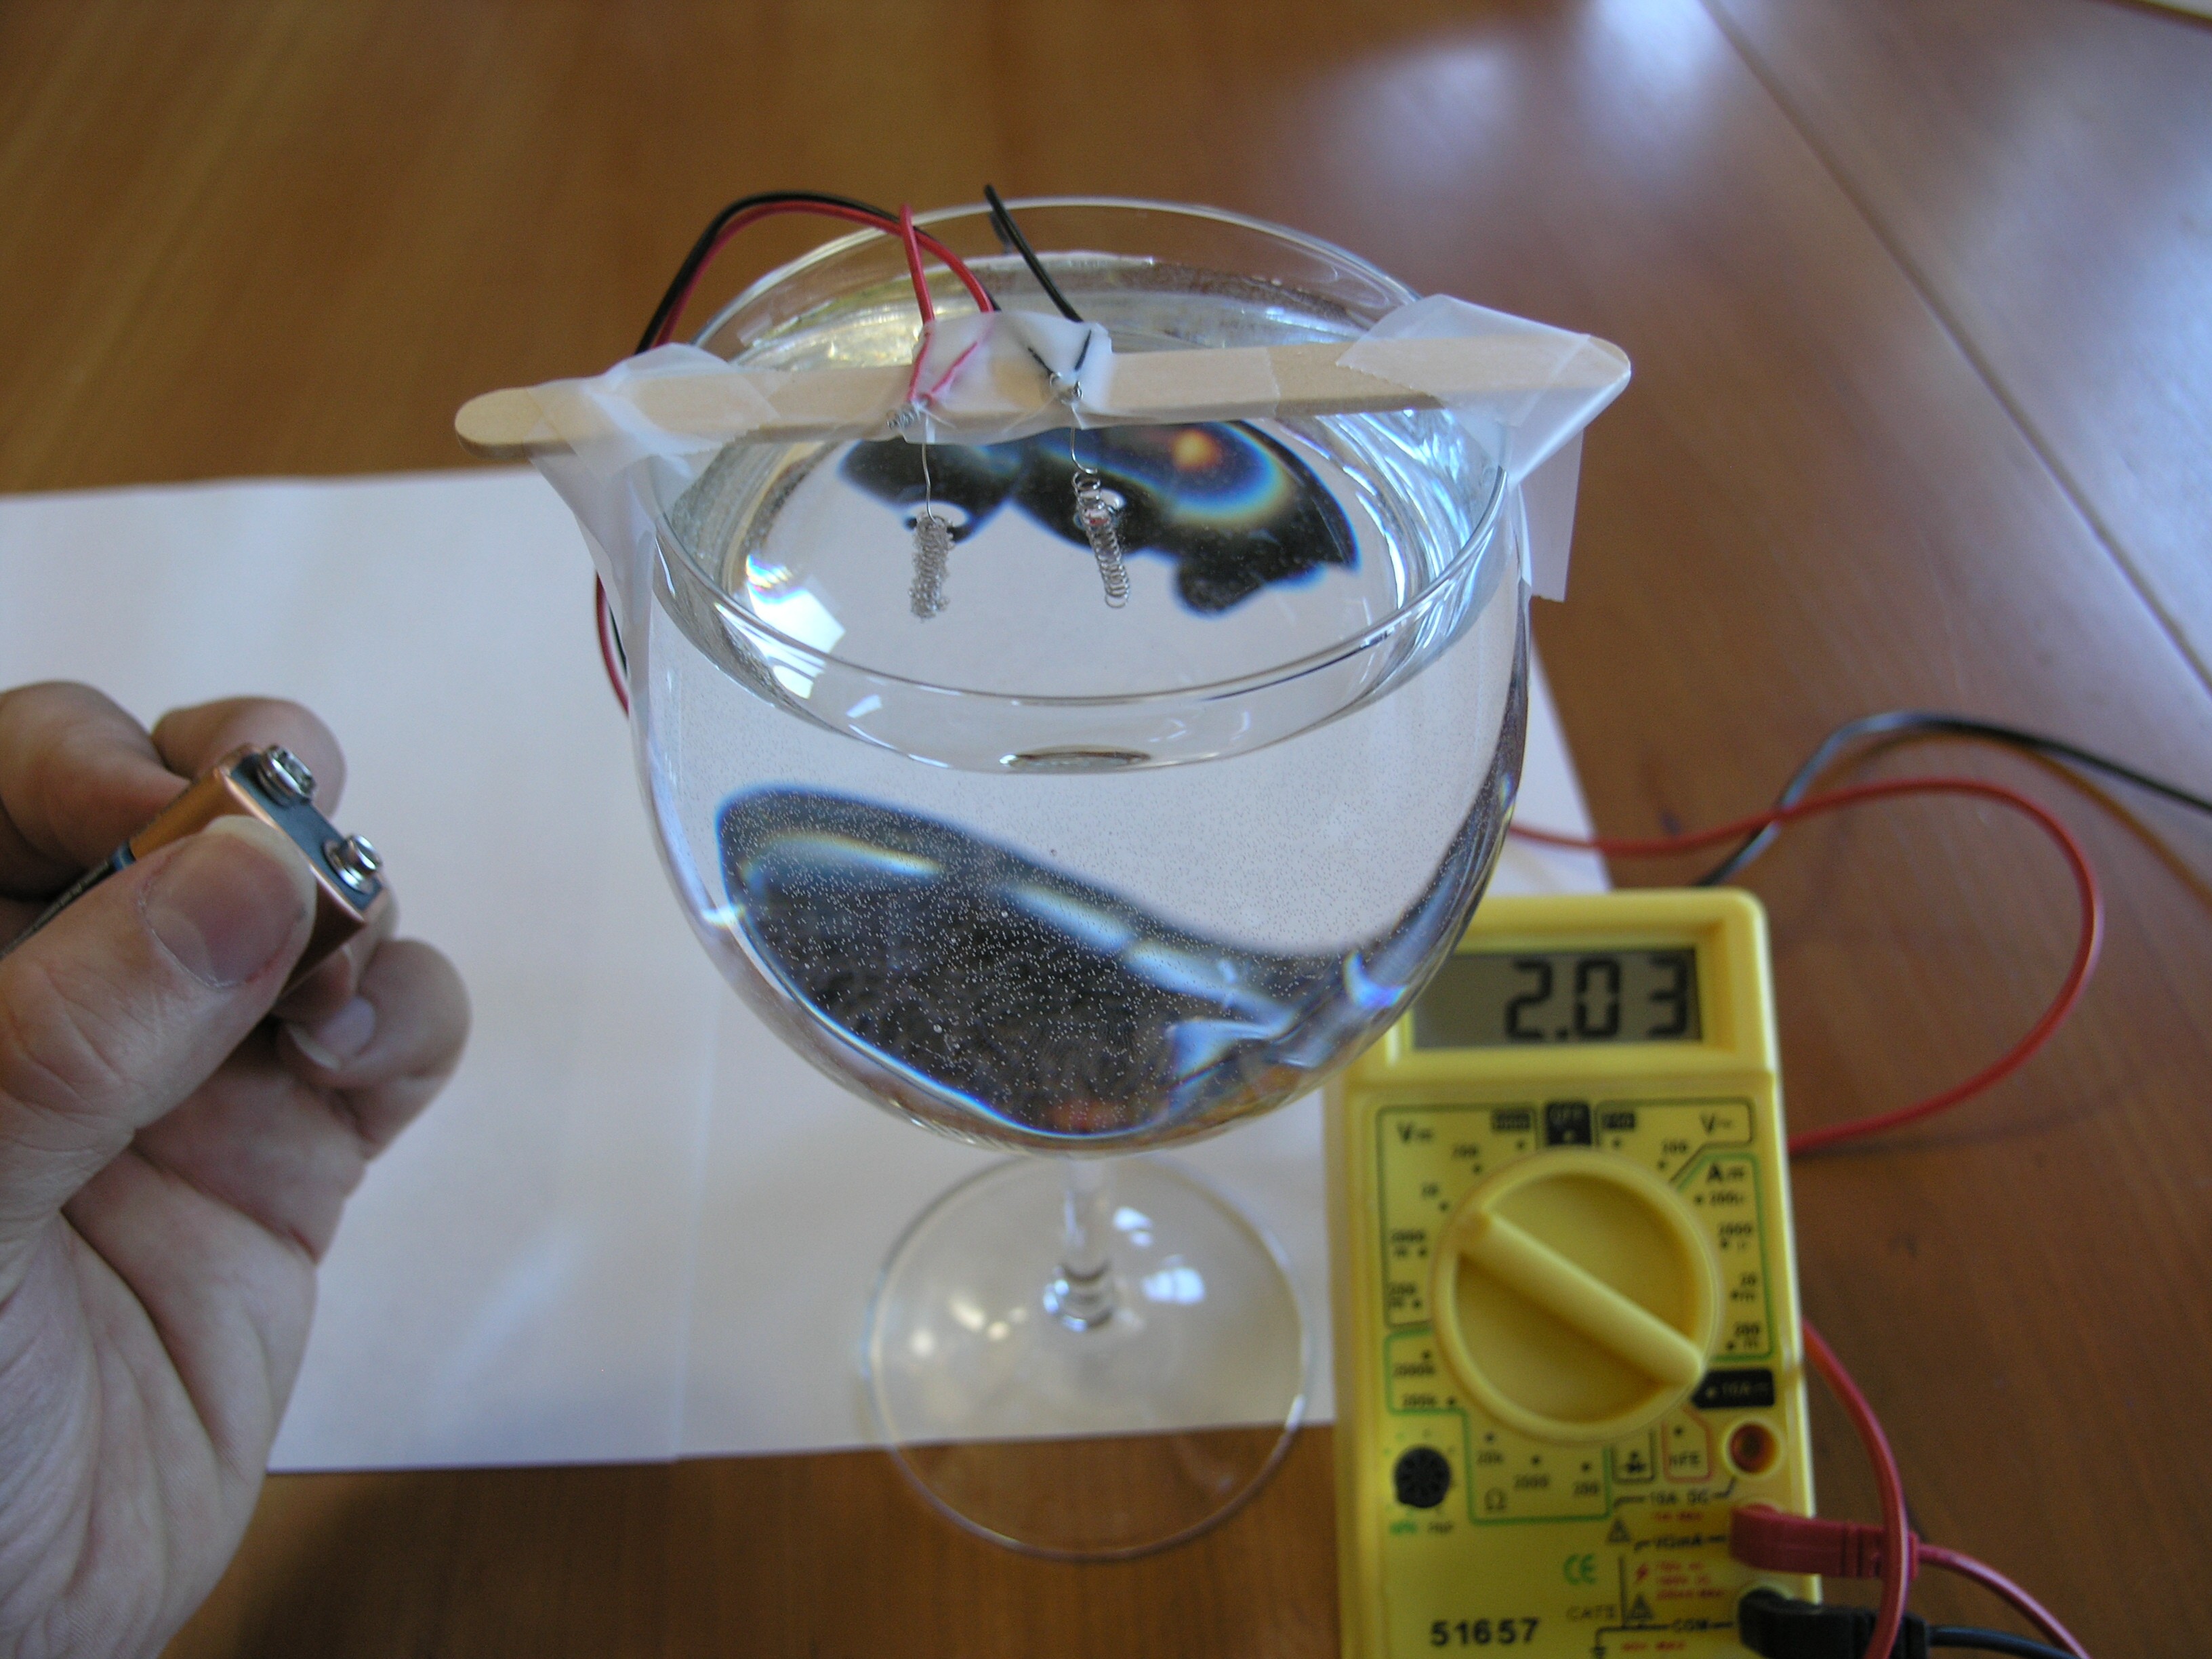
We initially get a little over two volts from the fuel cell. As the bubbles pop, dissolve in the water, or get used up by the reaction, the voltage drops, quickly at first, then more slowly.

After a minute or so, the voltage declines much more slowly, as most of the decline is now due only to the gasses being used up in the reaction that produces the electricity.
Notice that we are storing the energy from the 9 volt battery as hydrogen and oxygen bubbles.
We could instead bubble hydrogen and oxygen from some other source over the electrodes, and still get electricity. Or we could produce hydrogen and oxygen during the day from solar power, and store the gasses, then use them in the fuel cell at night. We could also store the gasses in high pressure tanks in an electric car, and generate the electricity the car needs from a fuel cell.
OK the fun part again :
The electrode connected to the negative side of the battery has electrons that are being pushed by the battery. Four of the electrons in that electrode combine with four water molecules. The four water molecules each give up a hydrogen atom, to form two molecules of hydrogen (H2), leaving four negatively charged ions of OH-.
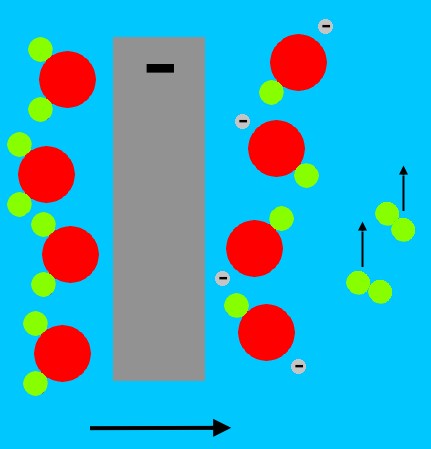
The hydrogen gas bubbles up from the electrode, and the negatively charged migrate away from the negatively charged electrode.
At the other electrode, the positive side of the battery pulls electrons from the water molecules. The water molecules split into positively charged hydrogen atoms (single protons), and oxygen molecules. The oxygen molecules bubble up, and the protons migrate away from the positively charged electrode.
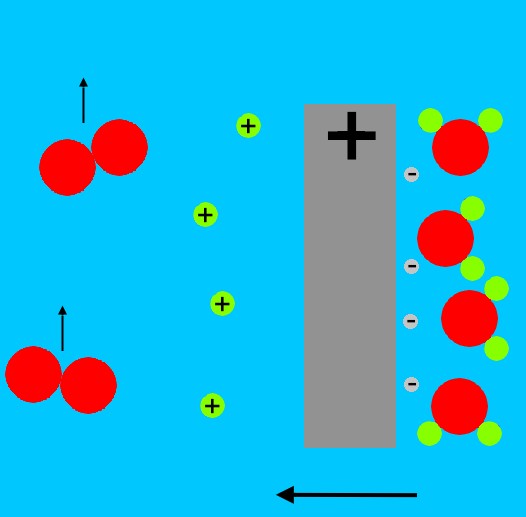
The protons eventually combine with the OH- ions from the negative electrode, and form water molecules again.
When we remove the battery, the hydrogen molecules that are clinging as bubbles to the electrode, break up due to the catalytic action of the platinum, forming positively charged hydrogen ions (H+, or protons), and electrons
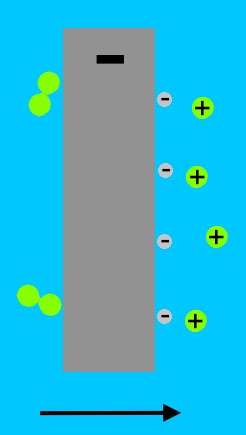
At the other electrode, the oxygen molecules stuck in bubbles on the platinum surface draw electrons from the metal, and then combine with the hydrogen ions in the water (from the reaction at the other electrode) to form water.
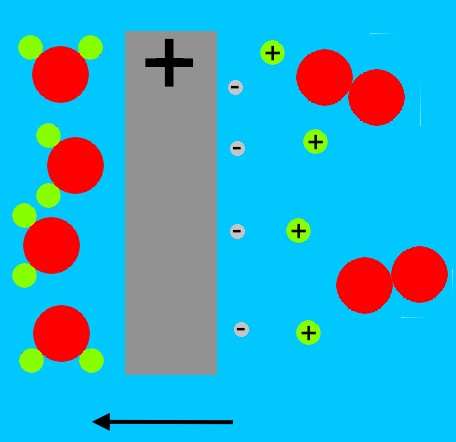
The oxygen electrode has lost two electrons to each oxygen molecule. The hydrogen electrode has gained two electrons from each hydrogen molecule. The electrons at the hydrogen electrode are attracted to the positively charged oxygen electrode. Electrons travel more easily in metal than in water, so the current flows in the wire, instead of the water. In the wire, the current can do work, such as lighting a bulb, or moving a meter.
source : sci-toys
Tuesday, April 03, 2007
Make a solar cell in your kitchen
A solar cell is a device for converting energy from the sun into electricity.The high-efficiency solar cells ,are made from highly processed silicon, and require huge factories, high temperatures, vacuum equipment, and lots of money.
If we are willing to sacrifice efficiency for the ability to make our own solar cells in the kitchen out of materials from the neighborhood hardware store, we can demonstrate a working solar cell in about an hour.
Our solar cell is made from cuprous oxide instead of silicon. Cuprous oxide is one of the first materials known to display the photoelectric effect, in which light causes electricity to flow in a material.
Thinking about how to explain the photoelectric effect is what led Albert Einstein to the Nobel prize for physics, and to the theory of relativity.
Materials you will need:
The solar cell is made from these materials:
>A sheet of copper flashing from the hardware store. We will need about half a square foot.
>Two alligator clip leads.
>Low voltage bulb
>An electric stove. The gas stove wont work . The little 700 watt burners probably won't work -- mine is 1100 watts, so the burner gets red hot.
>A large clear plastic bottle off of which you can cut the top. A large mouth glass jar will also work.
>Table salt. We will want a couple tablespoons of salt.
>Tap water.
>Sand paper or a wire brush on an electric drill.
>Sheet metal shears for cutting the copper sheet.
How to build the solar cell:
The first step is to cut a piece of the copper sheeting that is about the size of the burner on the stove. Wash your hands so they don't have any grease or oil on them. Then wash the copper sheet with soap or cleanser to get any oil or grease off of it. Use the sandpaper or wire brush to thoroughly clean the copper sheeting, so that any sulphide or other light corrosion is removed.
Next, place the cleaned and dried copper sheet on the burner and turn the burner to its highest setting.

As the copper starts to heat up, you will see beautiful oxidation patterns begin to form. Oranges, purples, and reds will cover the copper.

As the copper gets hotter, the colors are replaced with a black coating of cupric oxide. This is not the oxide we want, but it will flake off later, showing the reds, oranges, pinks, and purples of the cuprous oxide layer underneath.
When the burner is glowing red-hot, the sheet of copper will be coated with a black cupric oxide coat. Let it cook for a half an hour, so the black coating will be thick. This is important, since a thick coating will flake off nicely, while a thin coat will stay stuck to the copper.

After the half hour of cooking, turn off the burner. Leave the hot copper on the burner to cool slowly. If you cool it too quickly, the black oxide will stay stuck to the copper.
As the copper cools, it shrinks. The black cupric oxide also shrinks. But they shrink at different rates, which makes the black cupric oxide flake off.
The little black flakes pop off the copper with enough force to make them fly a few inches. This means a little more cleaning effort around the stove, but it is fun to watch.

When the copper has cooled to room temperature (this takes about 20 minutes), most of the black oxide will be gone. A light scrubbing with your hands under running water will remove most of the small bits. Resist the temptation to remove all of the black spots by hard scrubbing or by flexing the soft copper. This might damage the delicate red cuprous oxide layer we need to make to solar cell work.
Cut another sheet of copper about the same size as the first one. Bend both pieces gently, so they will fit into the plastic bottle or jar without touching one another. The cuprous oxide coating that was facing up on the burner is usually the best side to face outwards in the jar, because it has the smoothest, cleanest surface.
Attach the two alligator clip leads, one to the new copper plate, and one to the cuprous oxide coated plate. Connect the lead from the clean copper plate to the positive terminal of the meter. Connect the lead from the cuprous oxide plate to the negative terminal of the meter.
Now mix a couple tablespoons of salt into some hot tap water. Stir the saltwater until all the salt is dissolved. Then carefully pour the saltwater into the jar, being careful not to get the clip leads wet. The saltwater should not completely cover the plates -- you should leave about an inch of plate above the water, so you can move the solar cell around without getting the clip leads wet.

The chemistry behind it :
Cuprous oxide is a type of material called a semiconductor. A semiconductor is in between a conductor, where electricity can flow freely, and an insulator, where electrons are bound tightly to their atoms and do not flow freely.
In a semiconductor, there is a gap, called a bandgap between the electrons that are bound tightly to the atom, and the electrons that are farther from the atom, which can move freely and conduct electricity.
Electrons cannot stay inside the bandgap. An electron cannot gain just a little bit of energy and move away from the atom's nucleus into the bandgap. An electron must gain enough energy to move farther away from the nucleus, outside of the bandgap.
Similarly, an electron outside the bandgap cannot lose a little bit of energy and fall just a little bit closer to the nucleus. It must lose enough energy to fall past the bandgap into the area where electrons are allowed.
When sunlight hits the electrons in the cuprous oxide, some of the electrons gain enough energy from the sunlight to jump past the bandgap and become free to conduct electricity.
The free electrons move into the saltwater, then into the clean copper plate, into the wire, through the meter, and back to the cuprous oxide plate.
*Note:The cell produces 50 microamps at 0.25 volts.
This is 0.0000125 watts (12.5 microwatts).
Don't expect to light light bulbs or charge batteries with this device. It would take acres of them to power your house.
Source : SciToys
If we are willing to sacrifice efficiency for the ability to make our own solar cells in the kitchen out of materials from the neighborhood hardware store, we can demonstrate a working solar cell in about an hour.
Our solar cell is made from cuprous oxide instead of silicon. Cuprous oxide is one of the first materials known to display the photoelectric effect, in which light causes electricity to flow in a material.
Thinking about how to explain the photoelectric effect is what led Albert Einstein to the Nobel prize for physics, and to the theory of relativity.
Materials you will need:
The solar cell is made from these materials:
>A sheet of copper flashing from the hardware store. We will need about half a square foot.
>Two alligator clip leads.
>Low voltage bulb
>An electric stove. The gas stove wont work . The little 700 watt burners probably won't work -- mine is 1100 watts, so the burner gets red hot.
>A large clear plastic bottle off of which you can cut the top. A large mouth glass jar will also work.
>Table salt. We will want a couple tablespoons of salt.
>Tap water.
>Sand paper or a wire brush on an electric drill.
>Sheet metal shears for cutting the copper sheet.
How to build the solar cell:
The first step is to cut a piece of the copper sheeting that is about the size of the burner on the stove. Wash your hands so they don't have any grease or oil on them. Then wash the copper sheet with soap or cleanser to get any oil or grease off of it. Use the sandpaper or wire brush to thoroughly clean the copper sheeting, so that any sulphide or other light corrosion is removed.
Next, place the cleaned and dried copper sheet on the burner and turn the burner to its highest setting.
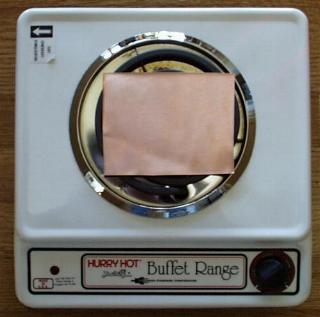
As the copper starts to heat up, you will see beautiful oxidation patterns begin to form. Oranges, purples, and reds will cover the copper.
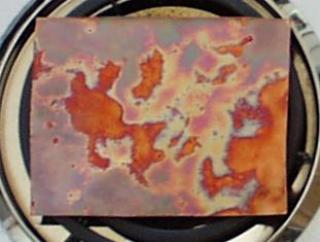
As the copper gets hotter, the colors are replaced with a black coating of cupric oxide. This is not the oxide we want, but it will flake off later, showing the reds, oranges, pinks, and purples of the cuprous oxide layer underneath.
When the burner is glowing red-hot, the sheet of copper will be coated with a black cupric oxide coat. Let it cook for a half an hour, so the black coating will be thick. This is important, since a thick coating will flake off nicely, while a thin coat will stay stuck to the copper.
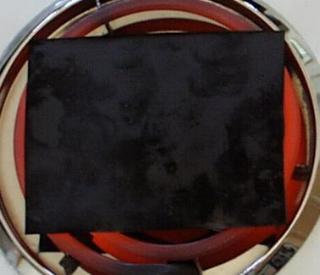
After the half hour of cooking, turn off the burner. Leave the hot copper on the burner to cool slowly. If you cool it too quickly, the black oxide will stay stuck to the copper.
As the copper cools, it shrinks. The black cupric oxide also shrinks. But they shrink at different rates, which makes the black cupric oxide flake off.
The little black flakes pop off the copper with enough force to make them fly a few inches. This means a little more cleaning effort around the stove, but it is fun to watch.
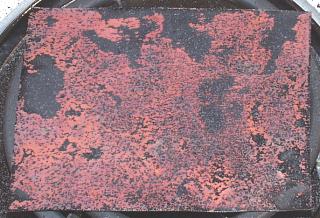
When the copper has cooled to room temperature (this takes about 20 minutes), most of the black oxide will be gone. A light scrubbing with your hands under running water will remove most of the small bits. Resist the temptation to remove all of the black spots by hard scrubbing or by flexing the soft copper. This might damage the delicate red cuprous oxide layer we need to make to solar cell work.
Cut another sheet of copper about the same size as the first one. Bend both pieces gently, so they will fit into the plastic bottle or jar without touching one another. The cuprous oxide coating that was facing up on the burner is usually the best side to face outwards in the jar, because it has the smoothest, cleanest surface.
Attach the two alligator clip leads, one to the new copper plate, and one to the cuprous oxide coated plate. Connect the lead from the clean copper plate to the positive terminal of the meter. Connect the lead from the cuprous oxide plate to the negative terminal of the meter.
Now mix a couple tablespoons of salt into some hot tap water. Stir the saltwater until all the salt is dissolved. Then carefully pour the saltwater into the jar, being careful not to get the clip leads wet. The saltwater should not completely cover the plates -- you should leave about an inch of plate above the water, so you can move the solar cell around without getting the clip leads wet.
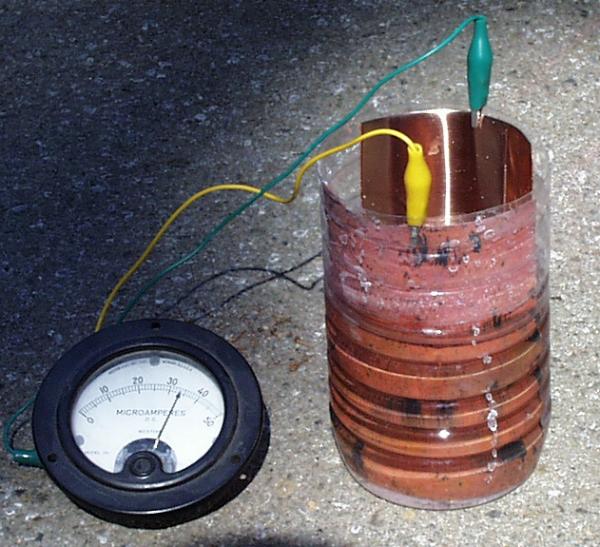
The chemistry behind it :
Cuprous oxide is a type of material called a semiconductor. A semiconductor is in between a conductor, where electricity can flow freely, and an insulator, where electrons are bound tightly to their atoms and do not flow freely.
In a semiconductor, there is a gap, called a bandgap between the electrons that are bound tightly to the atom, and the electrons that are farther from the atom, which can move freely and conduct electricity.
Electrons cannot stay inside the bandgap. An electron cannot gain just a little bit of energy and move away from the atom's nucleus into the bandgap. An electron must gain enough energy to move farther away from the nucleus, outside of the bandgap.
Similarly, an electron outside the bandgap cannot lose a little bit of energy and fall just a little bit closer to the nucleus. It must lose enough energy to fall past the bandgap into the area where electrons are allowed.
When sunlight hits the electrons in the cuprous oxide, some of the electrons gain enough energy from the sunlight to jump past the bandgap and become free to conduct electricity.
The free electrons move into the saltwater, then into the clean copper plate, into the wire, through the meter, and back to the cuprous oxide plate.
*Note:The cell produces 50 microamps at 0.25 volts.
This is 0.0000125 watts (12.5 microwatts).
Don't expect to light light bulbs or charge batteries with this device. It would take acres of them to power your house.
Source : SciToys
Friday, March 16, 2007
Potato Battery
If you thought that potatoes were only good for eating than you are wrong . Potatoes can also be used as low voltage battey and to prove this i will teach you to light a low voltage bulb with a potato battery .
Things you need : 2 potatoes (obviously) , glavanized zinc nails , copper wire , low voltage bulb
step 1 : Insert the galvanized nail to the ends of each potato .
step 2: Insert the copper wire to the other end of the patato keeping it as far as possible from the nail
step 3: Join the copper wire from the first potato to the nail in second potato so that we have a connection in series
step 4: connect (any device) the bulb to the terminals (the copper terminal act as positive and the zinc act as negative)
The chemistry behind this is simple . The potatoes contain phospheric acid whis allows the electrons to flow from copper to zinc . This means that if you would use fruit like lemons or oranges instead of potatoe the battery would still work . A single potato produces about 0.5 volt of current .
Try experimenting with other low voltage devices or by adding more potatoes for more power
Do not eat the potatoes after using them for batteries .
Things you need : 2 potatoes (obviously) , glavanized zinc nails , copper wire , low voltage bulb
step 1 : Insert the galvanized nail to the ends of each potato .
step 2: Insert the copper wire to the other end of the patato keeping it as far as possible from the nail
step 3: Join the copper wire from the first potato to the nail in second potato so that we have a connection in series
step 4: connect (any device) the bulb to the terminals (the copper terminal act as positive and the zinc act as negative)
The chemistry behind this is simple . The potatoes contain phospheric acid whis allows the electrons to flow from copper to zinc . This means that if you would use fruit like lemons or oranges instead of potatoe the battery would still work . A single potato produces about 0.5 volt of current .
Try experimenting with other low voltage devices or by adding more potatoes for more power
Do not eat the potatoes after using them for batteries .
Subscribe to:
Posts (Atom)